Wondershare DemoAir
DemoAir is an easy-to-use screen recorder to capture your screen and webcam to create a video message for better communication.
How to Record on Microsoft Teams Meeting on PC Both as a Host and Attendee?
Ever since the Global pandemic of Covid-19 hit, everything shifted from physical to virtual. People are working from homes, students are studying remotely, and people are not interacting with each other via virtual platforms. Microsoft Teams provide us the platform to connect with people whether they are our colleagues, students, or people in general.
In addition to this, Microsoft Teams is a platform widely being used by corporate and educational sectors for the purpose of holding meetings and connect with each other. In this article, we will learn the ways to record meetings on PC via Microsoft Teams both as a host and attendee. Thus, if you have been struggling in the past with recording your meetings, then read this article till the very end.
Why do we need to record meetings on Microsoft Teams?
Recording meetings on any platform is quite beneficial and is necessary for sharing with other people. Some people miss out on some meetings due to multiple purposes. In addition to this, some students are unable to take some classes.
Thus, if a meeting is recorded, it can be shared with multiple people who were absent during the meeting. This article has been written to serve you the same purpose. We will learn the ways to record meetings on PC both as a host and attendee on Microsoft Teams. Thus, let’s begin.
How to record on Microsoft Teams meeting as a host?
First things first, you need to comply with the pre-requisites prior to the recording of the meeting. These pre-requisites are:
• You need to be the host to record meeting as a host. For this purpose, organize the meeting and invite others.
• You have to take the consent of the admin to record the meeting.
• Other than this, make sure if you are the member of the same institution and have the same organizational account as others.
• Last but not least, you should be using Office 365 for this purpose. This is because such premium business suits provide the features to organize and record meetings on Microsoft Teams.
Steps to enable recording on Microsoft Teams
Follow these steps to record meeting on Teams as a host. You can also start the recording prior to starting the meeting. For this purpose, you need to be the host of the meeting. Microsoft Teams helps people interact with each other and record the meeting to share it with others via links.
• Start Microsoft Teams meeting on your computer.
• Join the meeting if it was scheduled in the past.
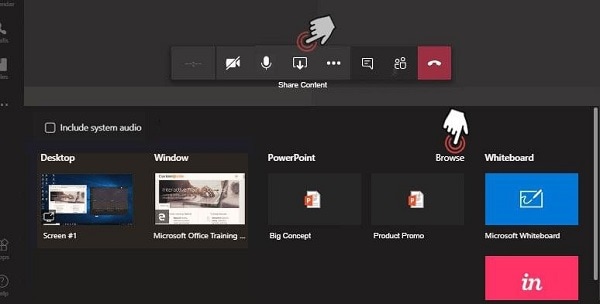
• Now share your presentation with others on Teams.

• Find the meeting control toolbar and tap on the “Share” button. You will be able to share the content with others.
• Once you are done with sharing your screen with others, start recording of your meeting.
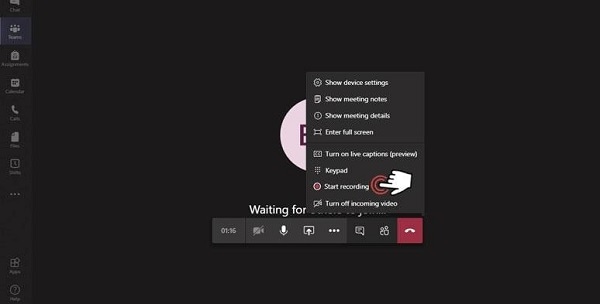
• Navigate to “More Actions” button and click on “Start Recording”. You will be sent a notification stating that the meeting is being recorded.


Wondershare DemoAir- Best Online Screen Recorder to Capture Your Team Meeting
10,000 people have downloaded it.
Quickly record video of your screen, webcam and audio, DemoAir is an essential Chrome Extension for your hybrid workplace.
Auto Save to Google Drive, free and safe to store your recording.
Trimming your video with easy, DemoAir is a lightweight tool to edit your recording.
Share your video with a single click, DemoAir is an expressive and effective way for you to connect with others.
Directly generate your embed code of your recording, brand video creating is easier than ever to upload to your own website.
How to record Meetings on Microsoft Teams with DemoAir?
Aside from the typical method of recording meetings on Teams, you can also go for the extensions available on the internet. Many free extensions could help you record meetings on Teams. In addition to this, you can also share the recorded meetings with such extensions.
So, we will learn the way to record meetings with DemoAir. Also, we will be learning the way to share such recorded meetings with external users via extensions like DemoAir.
Step 01: Get the DemoAir Screen Recording Extension
For this purpose, go to Wonder share website and get the DemoAir screen recording extension. It will help you capture everything on your screen.
Step 02: Start Recording
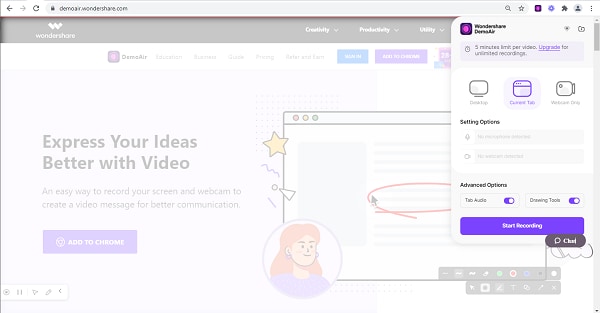
You will see the Chrome extension of DemoAir. Click on it to start recording the meeting on Microsoft Teams.
Step 03: Select the Desktop Option
You will see three options. Since the Microsoft Teams meeting will be held on your desktop, so click on the “Desktop” option.
You can give access to your Microphone and select your audio device.
You can also give access to your webcam. You will see options like “Drawing tools”. Enable all these options and give the access as per your requirements.

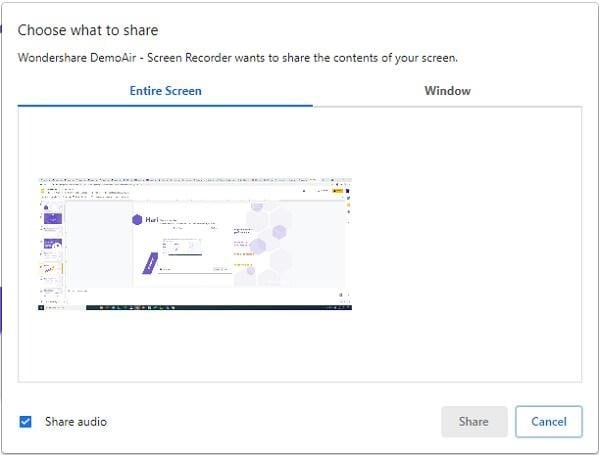
Now you will see a window asking you if you would like to record a specific part. Look between the options and select the one as per your requirements.
Now finally click on “Start Recording” and continue with your meeting. So, your meeting on Microsoft Teams along with your presentation on Power Point will be recorded.

Wondershare DemoAir
DemoAir is an online screen recorder to record your desktop, browser tab or webcam only and share video directly to different platforms.

How to share the recorded meeting on Microsoft Teams with external users?
Sharing the recorded meeting with external users is much easier now. This is because DemoAir saves the recorded video in your drive. You will find the recorded meeting in your drive. Thus, if you would like others to watch the recorded video, you can share them with the email.
Ask them their email addresses and share them the link. Also, you can give them the access to the recorded video saved in drive.
If you are not comfortable with giving access to your drive, you can simply create a sharable link and share it with everyone you would like to watch the recorded video.
Final thoughts
So, before concluding the article, now you know the ways to screen-record the meetings on Microsoft Teams. We have mentioned two ways to record the meeting on Teams. The first method is the default method by Microsoft Teams and the second method is to record the meeting using the extension DemoAir.
DemoAir helps you record everything on your screen. In addition to this, you can use your webcam and microphone if you would like to record your video and audio along with the presentation on Teams. Now screen recording and recording meetings on Team has become easier than ever. You can use these extensions and record everything you want.
