Record Webcam Video on Chromebook with DemoAir

David
Wondershare DemoAir
DemoAir is an easy-to-use screen recorder to capture your screen and webcam to create a video message for better communication.
The ongoing pandemic has driven us out of educational institutions and brought them to our homes. Although classes are still being carried out online on Zoom and other platforms, the issue arises when teachers have to record lectures or presentations.
This is where Chrombook comes to the rescue. Its built-in screen recording tool is a life saver for teachers and students alike to record lessons and informative material for better understanding. However, in case you want to take things up a notch and go for a screen recorder with better features, you can always go for Wondershare DemoAir to record webcam videos on Chromebook.
But like it is with every tool, using it might be a bit difficult for new users. Therefore, we have put together a detailed guide on how to record a webcam video for lecture or presentationson content on Chromebook using DemoAir
But before we get to that, let’s have a look at why Chromebook is the preferred choice in the educational sector.
Chromebook and Its Use in Education
Most people consider Chromebook as just another laptop. But let me tell why Chromebook is different from a standard laptop:
-
Chromebooks run on Chrome OS, an operating system by Google.
-
It has powerful built-in features like screen recording that can handle all essential tasks.
-
You can use it to run all Google-based apps like Google Drive, Google Assistant, Skype, Whatsapp, etc.
-
It has a low cost and easy management capabilities.
In short, Chromebook is a highly professional and multitasking system. You can get the most out of it at a relatively affordable price. That's the main reason it is being widely used by most businesses and institutions for recording meetings and lessons.
With that being said, let’s have a look at some reasons why Chromebook is so popular in educational institutions:
1. Ease of Use
The best part about Chromebook is its ease of use. Even if you are not tech-savvy, you can easily understand and use Chrome OS. It is a lightweight system that will make you find your way around with ease.
2. Price
Another factor that makes Chromebook a popular choice among students and teachers is its affordability. As it is devised for classroom use, you can get it in bulk at a less price as compared to Windows laptops or iPads.
3. Screen Recording
Among the many useful features of Chromebook, screen recording has proven to be one of the most helpful, especially in the field of education. It comes with a built-in screen recording tool that helps to capture important meetings, lessons, and worthy presentations to watch later.
4. Powered by Google
Chromebooks are powered by Google, which means that all apps and extensions specific to Google can easily run on it, including Wondershare DemoAir, an alternative screen recorder with more advanced and powerful features.
But how to record a webcam video with DemoAir? Let’s have a look:
Add to Chrome
How to Record Webcam Video with DemoAir on Your Chromebook
Although Chromebook is a full-fledged system with all vital apps, it's good to have an alternative option. One such alternative is Wondershare DemoAir for Chrome, a Chrome extension to record your screen and webcam to create a video message for better communication.
Below you will find a step-by-step guide on how to install and record webcam videos with DemoAir in your Chromebook.
How to Install Wondershare DemoAir?
1. From the Wondershare DemoAir Website
Step 1: Open the Wondershare DemoAir website and click on “Add to Chrome”.

Step 2: This will redirect you to the Chrome Web Store, where you can click on “Add to Chrome”.

Step 3: A pop-up will appear for confirmation. Click on “Add Extension”

Step 4: This will add the Wondershare DemoAir shortcut icon to the top of your Chrome browser. You can click it anytime you want to access it.

2. From the Chrome Web Store
Step 1: Open the Chrome Web Store.
Step 2: In the search bar at the top left, type “DemoAir” and click on the extension that appears as a result.

Step 3: Click on “Add to Chrome”.
Step 4: This will add the Wondershare DemoAir shortcut icon to the top of your Chrome browser. You can click it anytime you want to access it.
That’s how you can install the extension from the website and Chrome Web Store. Now let’s get to the steps involved in using Wondershare DemoAir to record a webcam video.
How to Record a Webcam Video with DemoAir
Step 1: Connect a webcam to your Chromebook.
Step 2: Click on the Wondershare DemoAir extension on your Chrome and sign in to your Wondershare account.
Step 3: It will give you 3 recording options: Desktop, Browser Tab and Webcam Only.

Step 4: Click on “Webcam Only” and allow “Setup Access” to your webcam and microphone. You need to do it only for the first time before recording.

Step 5: Get your content ready that you want to record and click on “Start Recording” to begin.

Once you’re done recording, press the DemoAir Extension Icon on your browser and click the "Stop" button to finish the recording to go to the next step.
You will be redirected to the “Video Detail” after finishing your recording. Here you can rename or delete your video.

You can also share your video via Gmail, YouTube, and other platforms by clicking on the desired option.

And that’s how you record a webcam video with DemoAir on your Chromebook!
In case you want to record a Google Slides presentation, you can follow the steps given below.
Record Google Slides Presentation on Your Chromebook
Step 1: Click on the DemoAir extension on your Chrome browser and select “Desktop” or “Browser Tab” from the recording options.
Step 2: Open the Google Slides presentation and click on “Present > Presenter View”.

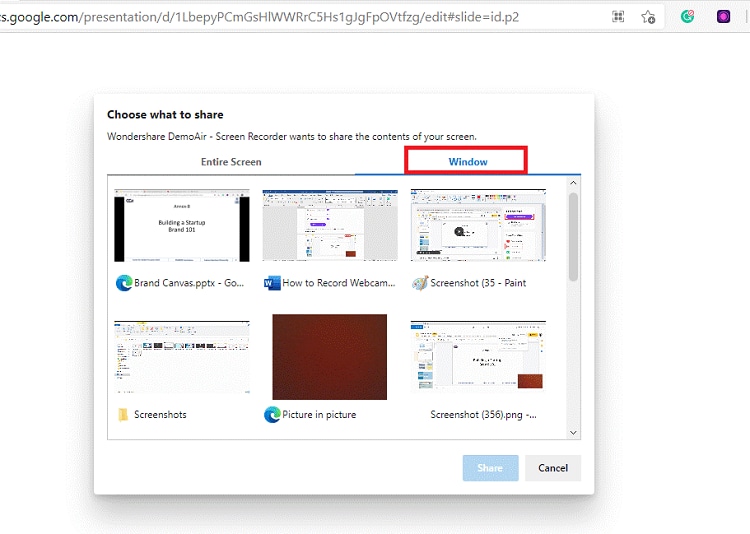
Step 3: Select the content you need to share and record. Click on “Entire Screen” or "Window" depending on the mode you want to record in. Next, click on “Share”.
Step 4: After a 3 second countdown the recording will start.

Step 5: Click on “Stop Sharing” once you’re done recording, or go to the extension and click on the “Stop” button.
Step 6: You will be redirected to the “Video Detail” page, where you can rename and share your video via the shareable link or email.

Conclusion
Wondershare DemoAir is an easy-to-use extension that helps you conveniently record your videos with just a few clicks.With various video recording options, it enables you to share your entire screen, a single window or just webcam mode. Not only this, you can use DemoAir to share your Google Slides presentations with annotation and focus mouse as well.
Sharing your recorded videos is also quite easy, as it directs you to the video interface, from where you can directly share to YouTube or Gmail, and even get a shareable link to share on other social media platforms.
Wondershare DemoAir is a resourceful tool that has made learning quite easy, especially with its screen recording feature. So get this extension now, with the help of the steps mentioned above, and make your life easier!
David
You May Also Like
How to Record Facebook Video Calls with Audio on Desktop, iPhone, Android
Facebook is one of the first social media networks that is offering the live video call option back in 2011. Sometimes we will need to recorder Facebook video calls for. In this article, we are going to offer screen recording solutions for Facebook video call on Desktop, iPhone or Android device.